Monday, December 30, 2013

NEW black sheep kits!

woolly sheep
For a limited time I will be carrying Woolly Black Sheep kits now available in my Etsy Shoppe:


grazing sheep
The kit creates an all black sheep from head to toe. In each kit I have included Frog Tree's Alpaca Suri in a dark grey color that corresponds with the black worsted. Once felted it creates a wonderfully soft and fuzzy sheep especially after being vigorously brushed the nap riser brush. The head, tail, and legs do not have the Suri carried along with to give a different texture after felting. The kit has all the makings for one sheep either in the standing position, as shown above, or the grazing position.

If you don't need another black sheep in your family at this time, I do sell the traditional sheep kits:


woolly sheep kit

 Happy knitting!
 

Sunday, December 29, 2013

we wish you a merry christmas!

woolly snowman
Merry Christmas!

Merry Christmas to you and your families this holiday season! Blessings on your new year as well. Thanks again for a 'woolly' good year!

Happy knitting!

Thursday, December 19, 2013

gingerbread cookie candle rugs

woolly gingerbread cookie


'Tis the season for all things sweet and sugary, but in this case, sweet but woolly. This larger-than-life gingerbread cookie candle rug would make a great holiday hostess gift. It measures about 10-inches tall from head to foot.

I used two strands of Cascade 220 worsted weight yarn and one strand of sport Berroco Ultra Alpaca, both in brown tones and size 13 dps. I followed my Woolly Gingerbread Cookie pattern just like a recipe. I had hoped that the alpaca would 'fill in' better than it did, but the garter stitch ridges were still apparent after several washes. Sometimes that happens when you double up your yarns. I am hoping to try it again but redesigning the pattern not knitting it in the garter stitch but rather in stockinette.

When I designed this pattern I wanted the thickness of a solid gingerbread cookie and the felted garter stitch does just that. The cookie when knit with only one strand felts beautifully and all the stitches disappear every time, but two strands is another story, sometimes.

vary the sizes
This photo, right, shows the differences in sizes: the smallest cookie is one strand of worsted and the large cookie, 2 strands worsted and 1 strand sport. The larger size lends itself perfectly for the candle rug idea.

Add a candle that gives off the aroma of sugar cookies or baking gingerbread as it burns. Too bad you can't eat them!

Happy knitting!


Sunday, December 15, 2013

here, little birdie!

woolly birds
Isn't this little bird just perfect as an ornament? Recognize the pattern? Yes, the Woolly Birds pattern, but knit using fingering weight yarn and size 5 double point needles. The photo doesn't capture the size very well. But the chickadee is about half the size of the worsted weight version. A perfect size for a holiday ornament for any bird lover!
sport weight and worsted
The photo of the cardinals shows them knit and felted in sport weight and also worsted weight so you can see the size differences using the same pattern but different yarn weights and needle sizes. The fingering weight yarn creates an even smaller size bird believe it or not. I keep the final detailing simple because of its small size, mainly no eyes and a needle felted beak. To finish, tie a ribbon or fishing line as a loop and you have a quick and easy ornament idea.

NOTE: Need a reference of what size needle to use for each yarn weight when felting? I have created a chart on my website for easy and quick referral:


Happy knitting!


Thursday, December 5, 2013

just a bit loopy - the next day!

woolly sheep
Remember the 'before' photo of this woolly sheep? that scrawny-little thing just waiting to be washed and felted? Well, here is the final result . . . I am so pleased with this little guy!

The pattern is my Woolly Sheep using Cascade 220 worsted weight yarn, #8010 cream, and adding the loopy stitch throughout the body. For further details see earlier post 'just a bit loopy'.

After felting the sheep and once it was completely dried, I brushed the body vigorously with a nap riser brush to create extra softness and fuzziness. Even though Cascade 220 worsted does not contain any mohair or alpaca, it still brushes the fibers enough to create a softness to the wool. I brush EVERYTHING these days. You can never be too sure.

In addition, I created a black sheep version too, below. On this sheep I trimmed the wild-looking ends that emerged from brushing (didn't do this on the cream version), and thus created a more nubby-look to the overall body. It really is personal preference which version you prefer.
And to finish it off, a sheep in or two! A perfect pin cushion for the Just Pins 'Sheep' pins, wouldn't you agree?


Happy knitting!

Wednesday, November 13, 2013

just a bit loopy!

woolly sheep pattern
I love to play when I can! and I sure have been playing with my Woolly Sheep pattern lately. I discovered the loopy stitch that creates little nubbies after felting. The felted version of this sheep is in the wash now as we speak.

I used Nature Spun worsted, Aran N91. It is a good, tried-and-true felting yarn. I knitted the exact same pattern but this time I added the loops, see above, every other stitch, on the knit rounds and every other round, starting just above the place where the leg holes are added (Round 8). It takes a bit more yarn obviously, but it is well worth it.

I have tried the loops with black yarn and LOVE IT! I will photograph the finished sheep and display them here in a day or two. Stay tuned!

NOTE: This pattern is now included in my new book, Whimsical Woollies.

Happy knitting!

Thursday, October 31, 2013

happy hoo-lloween!

woolly owl
Today in Minnesota it is cool and misty with a good chance of rain. Not the best day for trick or treaters. Tonight I am staying home passing out candy, my usual routine. But with a good movie and a little crochet I know I will be happy, as long as I don't mind getting up every 7 or 8 minutes. Better than eating a bowl of tootsie rolls!

Happy Halloween to you and your family!

Happy knitting!

Friday, October 18, 2013

woolly snowman kits are here!

woolly snowman kits
My snowman kits are finally put together and available for sale!

The kit has all the makings for one large or small snowman, complete with pattern, yarn and more. I have included a clay carrot nose in each kit to give a different texture. I love the clay noses because they hold their shape year after year. The scarf is knit using Frog Tree alpaca yarns to create a soft and fuzzy neck warmer. You will definitely have some cream yarn leftover to start another snowman!

Don't forget to brush your snowman after felting with a nap riser brush. I have found that it softens the felted wool and fluffs up any yarn even if it doesn't have alpaca or mohair in it. It also helps to hide some of the imperfections from the felting process, especially when using creamier or whiter yarns. Nap riser brush is not included in the kit.

The snowman pattern, kit and nap riser brush are all available for sale on my Etsy shoppe: Marie Mayhew Designs Stop by for a visit!


To mark 10 years of woolly snowman making, I have created a gold sticker and placed it on each pattern sold this year. Thanks to all those that have knit & felt snowmen for the past 10 years. It's been woolly fun!

Happy knitting!

Thursday, September 19, 2013

a tutorial, anyone?

harvest pumpkin
I have been brainstorming ideas on how to connect with you, my customers, easier. How to help you more. And how to help knitting and felting my patterns even more fun and whimsical. I came up with the idea of tutorials whether in video format or step-by-step photo tutorials.

I LOVE teaching classes because of this very aspect, the one-on-one availability to others and the opportunity to show them what I do for a living -- create!

So, I am asking: What would you like to see? What have you been curious about? Or have you taken a class by me and just need that visual reminder to go back to again and again? It is so nice having an online encyclopedia of information on the internet at your very finger tips, isn't it?

I came up with a few ideas to start with, such as:

1) A tutorial on how to make french knots Marie's way that work every time.
2) How to make cute faces with a few stitches and a little love.
3) How to make a clay carrot nose.
4) How to use a Wonder Washer (that also explains what a Wonder Washer is)?
5) Wool fiberfill versus polyester fiberfill.
6) Basics of needle felting or fixing things with needle felting.

Any others? I have been talking about doing something like this for a year or more, but now seem to have more time and gumption. I would love to hear what you would love to hear more about!

Happy knitting!


Wednesday, August 28, 2013

a new kind of spider!

embellished harvest pumpkins
Notice the spider in the left-hand corner? I am not a huge spider-fan in my everyday life but I do LOVE beaded spiders like the one above.

This spider came from a kit I bought at my local bead store several years back. But I recently found a tutorial on how to make your own beaded spiders that looks easy to follow so I thought I would share the link with you. It comes from the blog, Shawkl Designs, and the author gives great step-by-step instructions with photos to help.


Once I get my son off to college, I will be attempting these eight-legged little guys myself. I have so many beads around here I probably don't need to even go out to buy more!

The spiders look so 'pretty' (if that is even possible) and natural on my harvest pumpkins as well as the woolly pumpkins too. They add dimension and texture to the wool which I just love! Hope you have fun making a spider or two yourself! Make them in Halloween colors (orange and black) to get you in the harvest mood. Enjoy!

Happy knitting!

Sunday, June 23, 2013

Craftsy.com


Ever hear of Craftsy.com? It is a an online craft community similar to Ravelry where you can share your craft projects whether it be sewing, quilting, knitting, you name it. Craftsy also offers classes as well as options to buy craft supplies such as yarns and patterns.

As a knitter/felter, I also like to delve into a little embroidery, beading, crochet, baking and other crafty-like projects as the mood sways me. Craftsy gives you an outlet to share all your creative endeavors. I also have taken their online classes and hope to purchase another class on crochet embellishing. So much fun and convenient too!

I have recently added my line of patterns (pdf-format) onto their sight, so now they can be downloaded from there too. Come check out my pattern store: woollysomething

Happy knitting!

Tuesday, June 4, 2013

woolly snowman kits

woolly snowman kits
Summer months are usually slow for me business-wise what with everyone occupied with gardening and getting their kids finished with school for the year. Traditionally the yarn stores slow down as well. This Spring I have a son graduating from high school, thus I have been occupied with 'other' things other than creating much. But it hasn't stopped me from dreaming about future projects!

This fall I will be offering a Woolly Snowman Kit complete with pattern, beads, yarn and more! The kit will be part of the celebration of 10 years of snowman making. Where has the time flown? I seem to be asking this question a lot lately what with my son graduating.

I love the snowman pattern for its whimsey. It is one of my earliest patterns and has grown through the years with the addition of hats and accessories. I never tire of it, but I do have to follow my own instructions each and every time.

I am now buying the yarns needed for each kit, so stay tuned for further details.

Happy knitting!

Friday, April 5, 2013

chocolate hugging bunnies!

chocolate hugging bunnies
The pattern for this little bunny comes from the blog, Cherry Heart, by Sandra. I first heard about these little bunnies from my friend, Beth. Last year she gave me one and I fell in love with them. The pattern, Easter Huggie Bunnies, is a free PDF download. You can also find it on Ravelry.  They are a quick and easy knit. A great project for using up those scrap yarns. But of course, I went out and bought a few more fun colors nonetheless. I used Lily Sugar n' Cream cotton yarns. I ended up using a size 7 double point rather than the 8 prescribed. After experimenting, I determined I liked the knitted bunny to fit tighter around the chocolate egg.

Sandra's bunnies have little faces on them, obviously mine do not. After playing around with faces for a very LONG time, too long really, I decided that I didn't like the faces. And I realized, it is hard to embroider on a knitted piece, very different from embroidering on felted wool like I am used to.

finished bunny tails
But to my delight, a simple addition of a pom pom tail was just what my bunnies needed to finish them off perfectly! I made a pom pom using the white cotton yarn. Fluffed the tail up by swirling it gently between my hands, and then simply tied it to the bunny. That's all! and isn't it ever cute? FYI, I made all white tails for all colors of bunnies.

I bought a bunch of Cadbury Creme Eggs in various flavors: original creme-filled, chocolate creme-filled and caramel creme-filled, and stuffed a total of 16 bunnies!

As you can see from the photo, I placed my eggs on each dinner plate as a gift for my guests. I also treated my best girlfriends and my son's girlfriend as well.

My dream is to make a ton of these little bunnies and gift them to random people I encounter throughout the Easter season, a small version of the random-act-of-kindness-kind-of-thing.


Happy knitting!

Friday, March 15, 2013

A Real BIG Baby!


I just completed my over-sized Woolly Snowbaby and am very pleased. The original size of a felted snowbaby is 5-inches. The photo below shows the two sizes side-by-side.

 
two sizes of snowbabies
The little snowbaby used one strand of sport weight yarn and the large snowbaby, two strands of Cascade 220 worsted weight, #8010, and one strand of Frog Tree Alpaca cream sport weight yarn. The two yarns together created a wonderfully felted snowman! 

I used real twigs clipped from my crab-apple tree for arms. I held them in place by poking them into a small block of styrofoam placed within the snowbaby's interior. This worked slick! 
After having completed the arms this way, my first reaction is that I like him more withOUT the arms, but I wanted to have a photo to show with.

I didn't fill the snowbaby up with plastic poly-pellets like I usually do because of the size. I am planning on sticking a stone inside to give that extra weight, then sewing a circle of felt over the hole to finish off the bottom. 

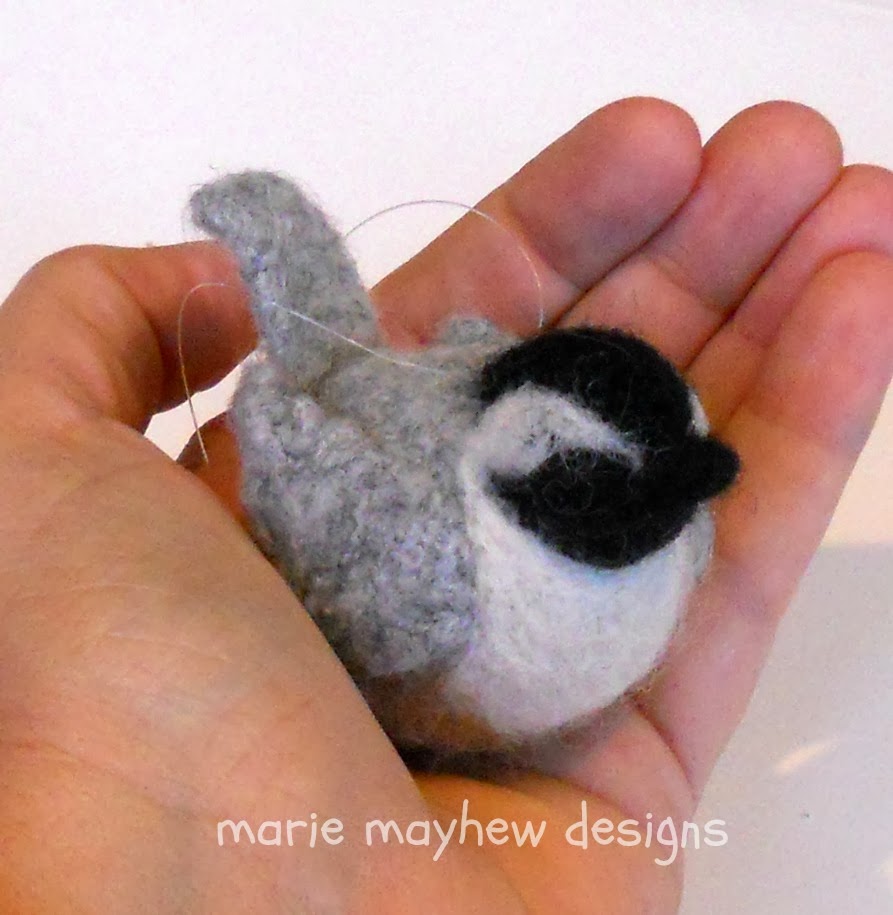
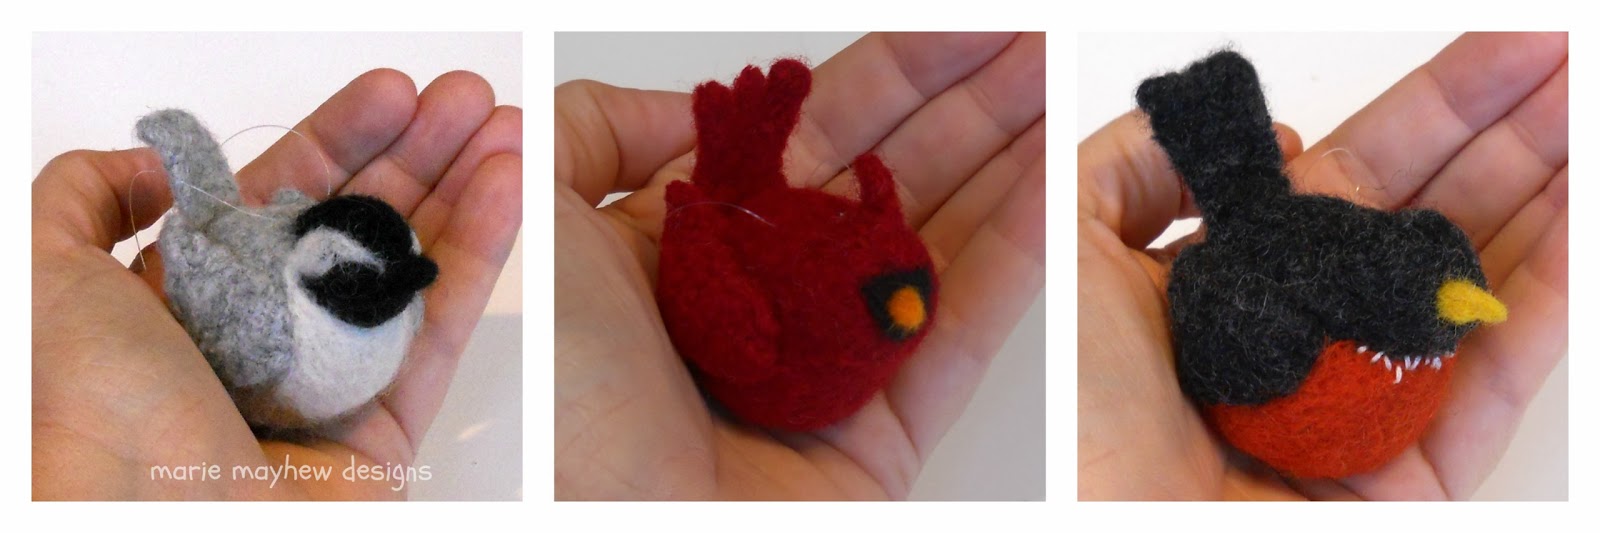
For the eyes, instead of the usual french knots, I embroidered several small stitches using worsted weight black yarn. Then I added a single stitch using DMC white floss to create a highlight dot.

The nose is red wool roving needle felted into a round ball and attached to the snowbaby's face. The cheeks are small bits of pink roving again needle felted to the face.

I love this size snowbaby! so many fun possibilities for outfits, hats and accessories! let it snow, let it snow, let it snow!

Happy knitting!


Thursday, March 14, 2013

A Little Bit of Blarney!

woolly leprechaun
Every year I need to introduce my little leprechaun to those that might not know him yet. He is created using the Woolly Gnome & Mushroom pattern and a few changes. For those that don't know, I have a free PDF download with all the changes for turning your little gnome into a little leprechaun. For that download and others, go to my website, Marie Mayhew Designs.

woolly mushroom
To help celebrate Saint Paddy's day, I found a fun snack mix with a bit of a twist, Thin Mint Puppy Chow! The recipe is adapted from the blog, Shugary Sweet. I made a few changes to include ingredients I could find in my local grocery store.


thin mint puppy chow

16 ounce chocolate Candiquik (for making almond bark)
4 ounces mint chocolate chips
a drop or two of peppermint extract, optional
2 cups powdered sugar
box of Crispix cereal
1 bag (8 ounce) mint M&M's (could never find these)

1) In the microwave, melt chocolates together for one minute, stir and continue melting in 30 second intervals until smooth.

2) Empty the box of cereal in a large mixing bowl. Pour melted chocolate mixture over cereal and gently fold until the cereal is good and coated.

3) Add the powdered sugar to an empty brown grocery bag. Spoon in the chocolate cereal mixture. Seal the bag and shake well until the powdered sugar has coated the cereal completely. Pour the mixture onto a cookie sheet and allow it to cool for about 20 minutes. Combine green M&M's with cereal, if you can find them, and serve. Enjoy!

My kids loved this minty puppy chow! My daughter brought it to her youth group and one young man ate most of it. He said that typically he can't eat puppy chow because he has peanut allergies and most recipes call for peanut butter. This recipe contains no peanut butter.

Happy knitting!

Monday, February 18, 2013

woolly snowman knit-a-long

woolly snowman
To help celebrate Woolly Snowman 2013, the 10-year anniversary of my Woolly Snowman pattern, I am conducting a KAL (knit-a-long).

I have bought my yarn and am ready to begin knitting today. On my Ravelry group, that's woolly something, I will share the details and tips along the way. Come join my group to stay in touch!

First off, I will be knitting my Woolly Snowbaby pattern but changing it out slightly. That is, I am going to make a large snowbaby using two strands of worsted and one strand of Frog Tree sport weight all carried together. I will use size 13 dps, rather than size 8. We'll see what the end result will be.

I am experimenting on the snowbaby because I am curious how the felting will turn out. I want to try it on the tall snowman pattern to create a LARGE one, door stopper-size. I will post plenty of photos along the way.

Happy knitting!

Friday, February 15, 2013

woolly sheep pin cushion

woolly sheep
Last week I started a Woolly Sheep knit-a-long on my Ravelry group, that's woolly something, and the photo above is the end result. I like my little guy!

I used yarns from my stash, Berroco Ultra alpaca worsted weight yarns, but after felting I don't think the cream was Berroco at all, only the black yarn. It didn't brush out nicely with my nap riser brush like it should have. I am not good at marking my yarns as I should. Oh well!

one in every family
To embellish over my disappointment in how the cream felted, I created a curly-cue pattern using 3-inch strands of 2-ply yarn and needle felting them onto the sheep. It is a little putzy, but worth the effort! The occasional dots here and there are embroidered french knots using the same yarn as the curls as well as to stitch the nose. FYI, I only embellished the sheep's front!

The pins are from Just Another Button Company and they are called 'button box'. The colors match perfectly! Another set of pins that would look equally as cute on my sheep are thematically called 'one in every family'.

I am starting a KAL (knit-a-long) of my Woolly Snowman starting hopefully today!

Happy knitting!

Wednesday, February 6, 2013

a woolly knit-a-long

woolly sheep with curly locks
Attention all you Ravelry fans!

I am trying something new on my Ravelry group page, that's woolly something. We are going to attempt a knit-a-long there. We will knit & felt the Woolly Sheep pattern. You can create either a black-and-white version or an all-cream lamb, your choice.

We begin tomorrow, Thursday, February 7th, 2013. Sorry such short notice, but come and join right in, anytime. I will be sharing my new unpublished updates to this pattern: a new approach to the legs. If everybody likes them, I will be sharing them with the world at large later on.

All you need is the current pattern and some yarn. Have any questions? don't hesitate to ask. All my patterns are now available in PDF format on Ravelry.

Look forward to knitting along with you!

Happy knitting!