Thursday, November 28, 2019

happy thanksgiving!


Thanksgiving 2019
Wishing you and your family a blessed Thanksgiving! Thank you for supporting me and my patterns over this year. I am so grateful for your encouraging words, photos and enthusiasm. It keeps me creating!

Look forward to a new year of knitting and fun new patterns.

Happy knitting!

Saturday, November 2, 2019

NEW! roly-poly snowman pincushion pattern

roly-poly snowman pincushion pattern

Introducing my newest pattern: Roly-poly Snowman Pincushion! Just published today. It is the 5th of a series of monthly pincushion designs: January's month. January rings in the color and snowy weather, reminding the child within each of us: It's snowman-time again!

The felted snowman measures about 3.5-inch/8.99-cm from the base to the top of its hat. Knitting begins at the bottom of the snowball working upwards to the top, changing yarn color for the hat, and finishing by picking up stitches for the hat's brim. The snowman is knit as one continuous piece. No sewing required. Once felted, the snowman's face is embellished with felt cheeks, button eyes and mouth, and your choice of either a roving cherry or clay carrot nose.
dusted with snow

The snowman is knit using 100% wool worsted weight yarns and size 10.5/6.5-mm double point needles. The skill level is beginning to intermediate because it requires double point needle experience. It is a quick and easy knit and felt, leaving lots of playing time for embellishing!

This winter build your own frosty snowman without ever leaving the house! Guaranteed to warm the hearts of all those winter enthusiasts.

NOTE: The pins shown in the above photo are from Just Another Button Company. This mini-pins set is sold in my Etsy Shoppe: Sing in the Snow pins

Happy knitting!

Friday, September 20, 2019

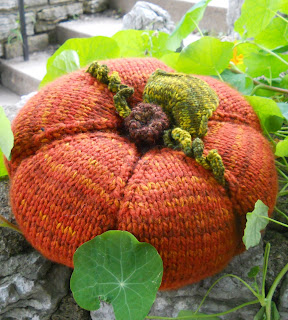
pumpkin pillow two!

two sizes of pillow-toss pumpkins
Pumpkin season has arrived, sooner than later this year! Cooler weather, shorter days.

After publishing the Pillow-Toss Pumpkin pattern, I continued playing and came up with a smaller version of the pillow. The smaller pillow measures about 9.5-inches across (the bigger pumpkin pattern measures about 12-inches). With a few edits to the pattern (see link to download below), you too can create a smaller pumpkin pillow!

12-inch pillow-toss pumpkin
Small-Size Pumpkin Instructions:
Knit the pumpkin the same as the original pattern, Pillow-Toss Pumpkin, up to the completion of Round 15 (78 its). Stop after this round. Jump then to Rounds 20-39 and knit the following pattern: *k13, p1*; repeat *to* to the end for 20 rounds.

NOTE: Change to size 11 dps at any time for ease of knitting. Place a stitch pin marker at this point to indicate the BOR.

Once the 20 rounds are complete, jump to Round 44, and begin the decrease rounds. Knit the rest of the pattern as per the original instructions. Assemble the smaller pumpkin pillow the same as the larger one, but use 2 to 3 total yards of Color B yarn for creating the furrow lines (instead of the original 4 yards).


For the smaller pillow-toss pumpkins, I don't attach
a knit leaf or curly vine. Just keep the smaller pillow simple and sweet. The combination of two pillow sizes makes a beautiful autumnal display!

Pillow-Toss Pumpkin Addendum download


Happy knitting!


Sunday, September 8, 2019

'k1b' pumpkin tutorial

cable-knit pumpkin
HELP ME, please? Are you having troubles figuring out the 'k1b' in my newest pumpkin patterns (pumpkin patch, cable-knit or tartan-plaid)? Well, you are not alone. I am finding out that 'k1b' can mean a lot of different things out on the web. This tutorial will put your searching to rest so you can finish that pumpkin with a smile still on your face!

The reason I chose a 'k1b' is because it is near-invisible increase and doesn't leave a hole. Holes are not good when stuffing with fiberfill. I am used to dealing with felted wool where everything evens out in the wash. I am having to learn new stitches to get the final results I want in my patterns, thus the 'k1b'. So here is a quick tutorial.

To create a 'k1b', first insert your right needle into the back of the stitch below the next stitch on the left needle. Insert the needle into the stitch and lift that stitch up onto the left needle, then knit it. Those two moves (lifting and knitting) is the 'k1b'.

Now, the original stitch (the stitch on the needle above) is still there to be knit, BUT it is NOT part of the 'k1b' sequence.

So for instance, in my cable-knit pattern on Round 4 it says to *k1, k1b, k1*; repeat *to* to end of round (36 its):

You knit one stitch (k1), lift and knit into the stitch below (k1b), knit one stitch (k1). That is the pattern. For every two stitches on the needle, you are increasing one more with the 'k1b'. Repeat this sequence throughout the round and you will have increased 12 stitches for Round 4.

Hope that makes sense. If not, email me and I can help you further. I am here to help. My patterns are meant to be enjoyable, producing enjoyable results. So, if you are not enjoying it, give me a holler.

mariemayhewdesigns@gmail.com


Happy knitting!

Wednesday, August 7, 2019

pincushions galore!

September  |  October  |  November  |  December
I finished 4 pincushion designs just shy of my August 1st deadline! I am thrilled to publish them and thrilled to be done with them. My goal is a pincushion for each month-of-the-year! Four more will roll out around Christmas time. Fingers crossed.

Each pincushion averages about 3-5 to 4-inches tall by wide, so they are all relatively the same size. They are all a knit & felt design. All have fun and new detailing which I have enjoyed playing with. Let me introduce them:

Back-to-School Apple Pincushion (September). Can be knit either as a solid-color or a two-tone (carrying two yarns together). It has a knit non-felted leaf with a cinnamon stick stem, complete with an apple-blossom end. Love it!

Black Retro-Cat Pincushion (October). Quick and easy knit and felt. Don't be limited by my face design, create your own. My daughter loves this one!

Crazy Quilt Acorn Pincushion (November). This pattern gives two designs: A solid-color acorn or a crazy quilt one with three panels of color. The cap on both acorns is knit using the seed stitch to create a bumpy-like texture.

Holly-Dazzle Ornament Pincushion (December). Similar to my Woolly Holiday Ornaments pattern but unique in the size and embellishments. I show you how to create the holly leaf & berry motif, so fun and fast with a little felt and needle felting. The caps are decorative metal caps sold either at a craft store or online in my Etsy Shoppe.

All the decorative pins shown are from Just Another Button Company. Many of the sets have been custom arranged for me and the only way to get them is through my Etsy Shoppe. The apple pins were made from buttons into pins for me and JABC is now selling them as part of their collection. How cool is that?

My goal is to have 12 pincushion patterns total, one for each month of the year. I have ideas for many, but if you have any thoughts, please be sure to share them. I am all ears!

Happy knitting!

Monday, March 25, 2019

a flock of sheep

woolly sheep
I just added four hand-knit sheep to my newest Etsy shoppe, My Woolly Somethings. It is a collection of fun and very textured woolly friends. All reasonably priced to sell, just in time for Spring!

The top left sheep was knit using Frog Tree brushed Suri (no longer available), so when brushed it is so soft and fuzzy to the touch. The top right photo, is the loopy stitch sheep. A nubby little guy that  would actually make a wonderful bath scrubber, but please don't do that! The third sheep, bottom left sheep, is so fuzzy and grey, another brushed Suri knit; a great addition to anyone's flock of knitted sheep (if you buy two or more, you get free shipping). And finally, the bottom right sheep has sewn to her front-side a collection of antique pearly buttons in various styles and sizes, a great gift for quilters and sewers. All the sheep are knit and ready to ship!

I am publishing an updated version of my Woolly Sheep pattern this week. It will include a new version to the legs, that is easier to knit.

The instructions for how-to-knit the Loopy Stitch sheep (top right photo) are found in my book, Whimsical Woollies.

Please remember, that if you ever have any questions on how I made something, don't hesitate to ask. I am always here to help.

Happy knitting!

Sunday, March 17, 2019

my woolly somethings

woolly chick with wire legs

I'm cleaning house, business-wise! That is, I'm sorting through my hundreds of samples and needing to pare down some!

I opened a second Etsy Shoppe to sell these 'extra' samples. My shoppe is called My Woolly Somethings.  I have made changes to many of them, as you may notice, making them truly one-of-a-kind. They are all knit and felted and ready to ship. No waiting required!

Hope you check out my shoppe! I am running a sale that if you buy two or more samples you will  get FREE shipping within the domestic United States.

A great gift for that special friend or family member to add to their Easter baskets.

Hope you find something you like.

Happy knitting!

Thursday, February 14, 2019

a crochet-edge heart

woolly sweet-hearts pattern*
Happy Valentine's Day!

Here in Minnesota a little sweetness is most needed amidst all this snow and polar temps this February 2019. Hope your day is a sweet wherever you are!

In honor of Hearts Day, what better way to celebrate but with a third and final heart embellishing tutorial: how to create a crochet edge on a heart knit and felted from my Woolly Sweet-Hearts pattern.

Materials needed for this design are fingering weight yarn in matching or coordinating color to the heart, a size C crochet hook, and a chenille needle.

The heart in the above photo is a large traditional-style design. It was first knit with worsted weight yarn and then felted.
blanket stitched heart

The shell edge is done all around the center of the heart, dividing it in half (cream heart photo). Using the fingering weight yarn, (the same yarn you will crochet with), embroider the 'blanket stitch' all around the heart. If you do the stitch in a contrasting color like I did with this cream heart, it can be left like this (no crochet edge) as a fun design in and of itself. It creates like a cord look around the heart.

Once the blanket stitch is stitched, start at the top of the heart, left-side, and move counter-clockwise. Begin crocheting a simple shell edge as follows: *dc, dc, sc, dc, dc all in one blanket stitch, sl st into the following blanket stitch, then in the next blanket stitch begin again*; repeat * to * until the end.

Stay loose and not tight. If too tight the shell edge will curl up. If this happens once completed, wet with water the crochet edge. Tug the edge slightly to even it out and allow it to air dry like this.

So whether you add a crocheted shell edge to your heart or not, here are two new embellishing designs to play and practice with.

Don't hesitate to ask if you have further questions. I am here to help.

Happy knitting!


*NOTE: The pins in the top photo are from Just Another Button Company, Will you BEE mine, Valentine? just pins set.

Wednesday, February 13, 2019

a curly-cue heart

woolly sweet-hearts pattern
Today's heart tutorial is one I call my curly-cue heart, for obvious reasons. I love this design! It is so easy to do but it looks so complicated. It is sure to get rave reviews with your family and friends.

The pink heart is the large folk-style design from my Woolly Sweet-Hearts pattern. Again, like with yesterday's heart, I only embellished the top side.

Materials needed for this design: an all-purpose (38-gauge) felting needle, fingering or sport weight yarn in a coordinating color to the heart, FireLine bead thread, fine beading needle and tiny seed beads (size 11 used in photo).

To begin the curly-cues, I cut several 4-inch lengths of yarn (fingering weight in photo). Fingering weight creates finer lines, and sport weight, slightly thicker. I took one length and created a small curl near the bottom of the heart. Then I used the felting needle and began poking the strand down atop the heart. I poked it lightly to slightly adhere it to the heart, holding the curl in position. I like to first baste all the curls down just in case I need to move one later if needed. Take another length and butt it up next to the first curl and form a second curl. Baste it into position.

Continue in this manner until the heart is covered in curls. I like to alternate the curls having a left facing curl butt up against right facing and so forth.

Once all the curls are in position, then I begin going over each of the curls again and again to permanently adhere them to the heart. As you continue to poke the yarn it will flatten and first seem like its getting wider. The more you poke the thinner it becomes, looking more like its original old self.

At the end of most of the curls, I added a little ball of pink, giving the curl further dimension. To create this look, cut a 1-inch length of pink yarn and pull the plies apart. Smoosh them between your fingers, creating a little bit of yarn fluff. Roll this fluff into a tiny ball and needle felt it down onto the curl's end, poking it into a round dot and then flattening it.

The final touch is the beads. I used size 11 seed beads in a pale pink color. I used FireLine clear beading thread because of its transparency. You can bead a top any color heart and it won't show. I sewed the beads randomly around the heart adding further texture and sparkle. I cut a length of bead thread long enough to sew on all the beads with one thread. The hardest part about beading is threading that darn needle, so work efficiently and use only one thread. For more detailed instructions on how to bead atop wool review my book, Whimsical Woollies or my Woolly Eggs or Woolly Holiday Ornaments patterns.

There you have it! Another fun and one-of-a-kind heart for your bowl of sweet hearts.

Don't hesitate to ask if you have any further questions. I appreciate the feedback.

Tune in tomorrow for my final tutorial, a crocheted-edge heart.

Happy knitting!


Tuesday, February 12, 2019

a crazy quilt heart

woolly sweet-hearts pattern
Today I am starting a 3-day tutorial ending on Valentine's day to show a few 'extra' embellishing designs you can adapt to my newest pattern: Woolly Sweet-Hearts. Remember, knitting and felting hearts doesn't have to be a Valentine-only project, but rather a year-round one, creating everyday hearts for those sweeties in your life.

The heart above is my 'crazy quilt' heart. In the pattern, this is the large folk style heart. A perfect size for embellishing a little extra. FYI, I only embellished the top-side of the heart, nothing on the back.

For materials, I used #5 perle floss in 3 colors (cream, dark and a lighter pink) and a chenille needle. I played with 5 of my most favorite stitches: the french knot, the feather stitch, the blanket stitch, the chain stitch and the fern stitch.

To begin, I divided the heart in half using the 'feather stitch'. This created two panels, one on either side, for embellishing. Why stop at two! I then stitched the 'blanket stitch'  to the side, creating a third panel. I added a few chain stitch flowers to the ends of the blanket stitch. Now I had 3 sections or rather three 'fabrics' to embellish on, like the combination of several crazy fabrics in the heirloom quilt blankets.

In my first section (the upper left corner), I created my first 'fabric'. I embroidered a cluster of 3 'french knots' to create a posy-look. I stitched two of them in a dark pink floss and the the third, a lighter color. I love the two-tone look of these flower-like knots. I actually happened upon this by mistake. I ran out of the darker floss and used another pink, a lighter one, to finish. In this case, a wonderful mistake!

In my second section (the upper right corner), I left this section red,  no added embroidery. With each section I wanted to create a different pattern or fabric. So leaving this section blank, no embroidery, created a second pattern in and of itself. I did add on the end of the blanket stitch arms (every other one), two 'chains', and one 'french knot' in the center of them, creating another flower design.

In my third section (the lower point), I created a third pattern/fabric to my heart by embroidering several small leaves or ferns using the 'fern stitch'. They are tossed about here and there.

All these stitches are simple and easy to learn. Their how-to instructions can be found online, in a basic embroidery book, and in the embellishing section within my own Whimsical Woollies book. So many resources to choose from. Pick 2-3 stitches and experiment with them. Remember practice, practice, and practice again!

If nothing else, remember this quick and easy tip from my book, Whimsical Woollies for perfecting those unruly french knots: Use an all-purpose felting needle and gently poke the sides of the french knots to even out their uneven spots. You'll have perfect knots in no time!

Hope you learned a thing or two. Still have a question? Don't hesitate to ask in the comments section below. I am here to help.

Stay tuned for tomorrow's 'sweet' heart adventure.

Happy knitting!


Saturday, February 2, 2019

NEW! woolly sweet-hearts

woolly sweet-hearts
My newest pattern, Woolly Sweet-Hearts, was published today, just in time for Valentine's Day! But with this pattern,  now everyday is a perfect sweet-hearts day.

every day is sweet-hearts day
Woolly Sweet-Hearts is a knit & felt design. The pattern gives instructions for a Traditional and Folk-style heart in two sizes: small and large.

The Traditional heart shape is more round and the Folk heart is taller, both in body and in the height of its bumps (the two rounded tops of the heart).

The hearts are knit using worsted weight yarn and size 10.5 double point needles. This creates a finished small heart about 2.5-inches wide by 3-inches high, and a large heart about 3.25-inches wide by 4-inches hight. Sizes do vary for each heart style design.

red, white, pink hearts
The hearts in the background, photo above, were knit using sport weight yarn and size 8 double points. Fill a bowl of hearts in several sizes, styles and colors!

In addition, the pattern gives instructions for two embellishing designs: Bee Mine and XXO. Once the hearts are felted, adding a button and simple embroidery turns them into messages of sweet endearment.

Legend says a red heart symbolizes love and passion; a white heart, true love and purity of mind; and a pink one, sweet friendship. Knit a heart in every color to show your true colors!

Happy knitting!