Saturday, November 19, 2016

NEW! needle felting kits

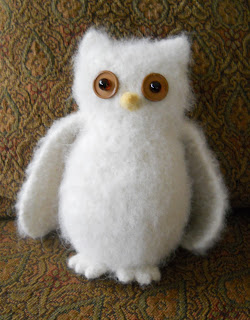
woodland baby owl ornament kit
Another new pattern available in my Etsy shoppe! I'm turning several of my knit & felt patterns into needle felting kits. Right now I have two available for sale: woodland owl and woolly pumpkin.

Each kit comes with all the materials needed to make one of these little sculptures. A great kit to learn the art of needle felting. If you are familiar with my patterns, you know I like using needle felting for  embellishing. But needle felting little 3-D creatures, like the owl above, adds a whole new level of creativity and fun to the art of needle felting! It is simple, quick and very similar to playing with play dough, but this time you use a sharp-barbed needle instead of your fingers.

woolly pumpkin ornament kit
FYI, my needle felting kits do NOT include foam pads. Why? While talking with my customers and gathering their feedback, several told me they had at least one foam pad already. They simply wanted the raw materials, another felting needle (cause they can break) and the detailed instructions to get them started. But for those of you just starting out, I do sell small high-density foam pads.

Check back with me and visit my Etsy shoppe as I add new patterns and kits this holiday season. My creative juices are flowing again, and I am excited to share them with you all. Enjoy!

Happy knitting!

Friday, October 7, 2016

pumpkin patch

pumpkin patch pattern
Create your own pumpkin patch without getting your hands dirty! This fall knit a basket of pumpkins in bright autumn colors.

Introducing my newest pattern, Pumpkin Patch! I am calling it a 'just knit' pattern, the first in my new line of patterns. Knit patterns with no felting required! That's right, no felting.

I am planning on turning several of my existing 'knit & felt' patterns into 'just knit' patterns within the next year. Learning to knit so tight, to create a firmer fabric without felting is a trick for me, but I think I am getting the hang of it.

I really like this pattern for several reasons: one being the texture the simple knit stitch creates, and secondly, the opportunity to use a variety of yarns. No longer am I limited by all-wool yarns. Rather I can use cottons, even ribbon if I wanted too.

The pattern gives instructions to create three pumpkin sizes: small, medium and large. The pumpkin is knit in one continuous piece with no sewing of seams. It is stuffed with fiberfill. Once stuffed, six furrow lines, a lacy knit leaf and a curly beaded vine are attached. Pumpkin Patch is a quick and easy knit. This pattern is recommended for intermediate knitters because experience with double point needles is necessary. Pumpkin Patch is available in either booklet or PDF format. Enjoy!

Happy knitting!

Saturday, July 16, 2016

a black owl special

halloween owl sale
Start your Halloween knitting a little early this year! I am selling out of my skeins of black Nature Spun worsted weight yarn and as an incentive, I am throwing in the Woolly Owl pattern for half off. I am calling it the 'black owl special'. One skein will make one owl with some leftover yarn.
woolly owl pattern

The pattern comes with two owl designs: the tufted-ear and the round head. I like the tufted-ear version for making black owls the best, but don't be limited by that. Nature Spun worsted yarn felts beautifully! Add a fine mohair along with the knitting to get a finished hairy-like fuzzy look (such as Frog Tree Suri alpaca or Rowan Kidsilk Haze) once felted the owl can be brushed with a nap riser brush.

Each owl stands about 8-inches tall after felting. A quick and easy knit project! The fun is in the embellishing, adding all your little details. Enjoy!

Happy knitting!


Thursday, June 30, 2016

a cheesy felting tool

cheese grater

I just have to tote the wonders of my handy-dandy cheese grater! I recommend this trick all the time to my felting classes, but I highly recommend it now!

Yesterday I was felting in my Wonder Washer an all-cream sheep for a customer, and I wasn't liking how it was felting. I had felted it, stuffed it with fiberfill and as it dried the stitch definition returned. I knew this yarn was capable of felting better (by past experience). Normally I would pull out the stuffing and throw the piece back into the wash for another cycle or two, but I was concerned about the sheep's leg holes felting shut making it difficult to insert the leg wires afterwards.

back and forth against the grates
In a panic, I pulled out my ordinary cheese grater, hoping for a miracle. I wet the sheep with soap and water and rubbed the stuffed body vigorously back and forth against the smallest grates (bumpy-side up), and it felted beautifully! No stitch definition what so ever! I was relieved and so pleased.

Using the cheese grater gave me precise control over particular areas as well as broader ones as well. Great for those items that just need a little extra felting help. I encourage you to try it, if you haven't already. You'll love the results!

Happy knitting!


Monday, May 16, 2016

what a 'hoot'!

Hoot
This little gal was a custom order requested from an Etsy customer of mine. She loves Jane Hissey's books about Hoot the adventuresome owl. The owl above still needs her blue-star apron to finish her off. It is being sewn by the customer for her as we speak.

I used my basic Woolly Owls pattern with a few changes. The yarn I used was Cascade 220 worsted cream (#8010) and Frog Tree sport alpaca cream (#000) knit together. After felting it created a thick fuzzy surface that was then rigorously brushed with my nap riser brush. I added ears and some fun button eyes.

I wanted to show you this little owl because I tried a new idea with these eyes. The 1-inch round brown buttons came from Hobby Lobby with 4 holes for sewing. My husband drilled a 5th hole through the center of each button. This hole would be used for inserting the glass eye into. Using a fine chenille needle and fishing line, I sewed each button onto the owl, sewing into the four holes one all the way around creating a square of thread, not crisscrossing over as you would traditionally do. This created a flatter surface for the glass eye to lie on afterwards.

The glass eyes are sold in a pair connected by a long wire. If you are looking for glass eyes for your little woollies, check out Glass Eyes Online, a great resource for eyes in all colors and sizes. I poked the wire through the center of the button (drilled hole) and into the owl's head. At that point I glued the wire's stem with E-6000 glue, adding a little on the back of each glass eye. Once the glue was completely dried, I squeezed the head of the owl, front to back, causing the wires to poke out from the back of the head. I then trimmed off the excess with a wire cutters.

I was so pleased with the end result that I wanted to share my little gal with you. She is now on her way, flying through the mail to her new home.

If you have any further questions, don't hesitate to ask.

Happy knitting!


Friday, March 25, 2016

hop-py easter!

woolly eggs and pocket-size woolly bunny
Wishing you and your family a blessed Easter season! May it be filled with more time with family members, extra knitting and just enough chocolate eggs. Blessings!

Happy knitting!

Thursday, March 17, 2016

happy st. paddy's day!

Lucky the Leprechaun gnome
According to Irish folklore, a leprechaun is a male faerie and most of them are cobblers. They are known to be mischievous and love to bury their treasures. Don't wait for a rainbow to appear to make your very own leprechaun!

Lucky the Leprechaun is one of three adaptations to my original Woolly Gnome pattern. These adaptations are only available now in my book, Whimsical Woollies. The book has instructions for a woodland gnome and mushroom (complete with polka dots), Matilda the Witch, Jolly St. Nick gnome and yours' truly, Lucky the Leprechaun.

Remember that you can vary your gnomes size by switching out the yarn weights and needle size, creating very small to very large gnomes. Enjoy!

Wishing you hours of knitting with shades of green yarn and sipping a good strong beer! Happy Saint Patrick's Day!

Happy knitting!


Thursday, March 10, 2016

a new tutorial

woolly nest & eggs

Yes, I have started to add tutorials to my blogspot, finally.

Just in case you hadn't noticed the links (on the left side of this page, listed under my 'welcome' sign). These are extra pages within my blog that supply further information for my readers: an about me page, a my patterns page (listing a link to all my patterns on Etsy), a my tutorials page, and a my book page (my new book, Whimsical Woollies).

I love online sights with tutorials, and want to have more of the same here for you. My book has certainly helped with this by having dozens of ideas and photos all in one convenient place!

I recently added a nest & eggs tutorial on nest making. The Woolly Nest & Eggs pattern is by far my favorite pattern. I love the textures of the felted wool with novelty yarns, how the ribbons pop out here and there, and the subtle colors, as well as the whole idea of thinking like a bird and building a nest in the first place.

This particular nest, along with my nest ornaments in a box are by far my best sellers for hand-knit items on my Etsy sight. In addition, I get requests for the specific yarns and materials, and their sequence that I use in my own nests, as shown above. So I have created a official tutorial to share with you. Hope you enjoy it, and find it useful.


Happy knitting!

Thursday, January 28, 2016

a sweet valentine treat

woolly cupid corn
This past weekend my husband and I toured a college with my daughter, and spent the day in Kenosha, Wisconsin, not far from the home of the Jelly Belly factory (Pleasant Prairie, WI). We didn't tour the factory this time, but I have in the past. What a fun tour! As a result though, I have been craving these little juicy jelly beans ever since we left Kenosha. But enough said about jelly beans! Let's talk candy corn, which by the way, Jelly Belly manufactures as well.
traditional colors

In the process of creating my pattern, Woolly Candy Corn (either PDF and booklet format), I called the Jelly Belly company to verify the names and colors of their candy corn so I could duplicate them in wool. Thus the pattern gives instructions for turning your woolly candy corn into: cupid corn (Valentine's Day), bunny corn (Easter), original corn (traditional colors), harvest corn (Thanksgiving), and reindeer corn (Christmas). Candy corn for every season of the year!

embellish your candy
What I love to play with are the varying sizes of these candies using different weights of yarn and needle sizes: tiny (fingering weight), small (sport), medium (worsted) and large (bulky). So simple but so much fun. A bowl of felted eggs and candy corn in various sizes is a whimsical display for any table top. Less calories too, not to mention all the calories burned knitting them!

Experiment with a variety of yarn weights, the different seasonal corn colors as well as a great way to practice those embellishing skills on these little works of art. Enjoy!

Happy knitting!


Below is a fun little Valentine's Day trivia taken from the Jelly Belly candy's website. A time when life was much simpler, eh?

"The saying 'wearing your heart on your sleeve' is from the Middle Ages. Boys at this time would draw names of girls to see who would be their 'Valentine' and then wear the name pinned on their sleeve for a week."

Sunday, January 17, 2016

book review: 'cause I felt like it

the tools of the trade

"The wool fibers expanded and wrapped around each other, locking together and creating a tight fabric through which no winter wind could blow."
-- Kathleen Taylor, Knit One, Felt Too


I start out the first chapter of my book, Whimsical Woollies, with this quote. I love it! Felting is so magical and unpredictable yet so scientific and predictable as well. The first chapter is entitled: 'Cause I felt like it: The Basics of Felting. I write about the details of felting such as the materials needed (shown in the above photo), the how-to tips and tricks to felt perfectly each time, an explanation on the washing machines available for felting (the front loader, the top loader and the Wonder Washer), as well as how to hand felt those smaller and more intricate items. Each section is sprinkled with my favorite ideas, tools I use, what I like and don't like.
loose and sloppy knitting


Included in this chapter is a section on felting white versus cream yarns (why some work, some don't); what makes a successful felting yarn and how to knit with it; what to do if your project is not felting enough; how to prevent color bleeding; and how to make a project smaller and bigger. 

Do you have questions on how to felt, how it works, why it doesn't work sometimes? I am happy to answer them all in Whimsical Woollies

The next chapter for me to review is For the Love of Detail: Embellishing (coming soon).

Happy knitting!

hand-knit for you

hand-knit for you
I knit custom orders for customers all the time. Sometimes they want a sample to knit from while they knit their very own. Sometime the hand-knit is a special gift for a special someone, or finally it comes down to it that they don't knit but appreciate hand-knit items.

The beauty of custom knitting is you can request details that can be added to your little sculpture -- such as size, specific colors, expressions -- all contributing to that truly one-of-a-kind custom order!

So if you have been admiring one of my patterns for some time, but have been hesitating, why not consider having it custom knit for you. I do all my own knitting and felting, and look forward to working with you soon. Don't hesitate to ask.

Happy knitting!